Welcome to the fascinating world of Dieffenbachia! In this article, we will explore every aspect of this tropical plant together, providing detailed information and practical tips for growing it.
From its origins in nature to the dangers of its poisonousness, through the best practices for positioning indoors and outdoors, to the secrets of proper fertilization and propagation. Get ready to discover all the secrets of Dieffenbachia and bring a touch of tropical nature into your home.

Habitat and Origins
Dieffenbachia, along with Monstera, is one of the most beloved tropical plants. Native to the jungles of Central and South America, including Brazil, Costa Rica and Colombia, this exotic plant thrives in natural habitats rich in biodiversity.
Its natural habitat is tropical rainforests, which are characterized by tall trees, diffuse shade, and high humidity. In the understory of these forests, Dieffenbachia thrives in shady, humid environments, among dense vegetation. It is not uncommon to find it next to other iconic plants of tropical forests, such as Orchids, Philodendrons, Ferns, and Bromeliads.
Therefore, you will need to provide the Dieffenbachia with the optimal light and humidity conditions suitable for growth, recreating those of its natural habitat. This will allow it to thrive.

Characteristics
Dieffenbachia is a plant with distinctive characteristics that make it a popular choice for houseplant lovers. Here are some of its main characteristics:
🍃 Decorative Leaves: Dieffenbachia is known for its large, broad, variegated leaves, with unique patterns and eye-catching colors that add a touch of tropical beauty to interiors.
🌒 Shade tolerance: This plant is known for its ability to tolerate low light conditions, making it an ideal choice for indoor environments where natural light may be limited.
🪴 Adaptability: Dieffenbachia is relatively easy to grow and suitable for a variety of home environments. It can be grown in containers or as a ground plant, and its growth can be easily controlled through pruning.
🫧 Air purifier: Like many houseplants, Dieffenbachia is known for its air-purifying abilities, helping to remove pollutants such as formaldehyde and carbon dioxide from indoor environments.
⬆ Fast Growth: Under optimal conditions, Dieffenbachia can grow quite rapidly, producing new leaves and increasing its volume over the course of a few months.
💚 Variegation: Some varieties of Dieffenbachia display variegated leaves with shades of light green, dark green, and white, adding further visual interest to the plant.
💪🏼 Resilience: Despite its poisonous nature, this beautiful plant is generally disease and insect resistant, making it a reliable choice for houseplant lovers.
The species of Dieffenbachia

Dieffenbachia includes several species, each with unique characteristics:
- Dieffenbachia Seguine: characterized by broad, variegated leaves.
- Dieffenbachia Maculata: has colored spots on the leaves.
- Dieffenbachia Amoena: known for its particularly pronounced variegation.
- Dieffenbachia Picta: the leaves are narrower and more colorful.
- Dieffenbachia Exotica: larger and less variegated leaves.
Each species offers a variety of colors and shapes, allowing plant enthusiasts to choose the one that best suits their aesthetic preferences and the growing conditions of their home environment.
Toxicity and precautions

Despite its beauty, it is important to be aware of Dieffenbachia's poisonousness.
Its large, variegated leaves, adorned with unique designs, can cause irritation and swelling of the mouth and throat if ingested or if in any other way parts of the plant are come into contact with the mouth. The classic case is that of children who touch the plant with their hands and then put their hands in their mouth; the situation worsens if the leaf is ingested.
It is therefore essential to keep the plant out of the reach of children and pets.
Toxicity is due to the presence of calcium oxalate crystals in the leaves, which can irritate the skin and mucous membranes. It is advisable to use gloves when handling the plant and wash your hands thoroughly after direct contact. If ingested, seek immediate medical attention.
Where to place it in the house: light and temperature

To ensure optimal growth of Dieffenbachia, it is essential to choose the ideal location in the home.
🌤️ This houseplant thrives in locations with bright indirect light. Avoid direct exposure to intense sun to prevent leaf damage, preferring instead locations with filtered or indirect light, such as near north or east-facing windows.
🌡️ As for temperature, Dieffenbachia prefers environments with constant and moderate temperatures. During the day, the ideal temperatures range between 18°C and 24°C, while during the night it is advisable to maintain a slight freshness, around 16°C – 18°C. It is important to avoid sudden changes in temperature and air currents that could stress the plant and damage the leaves.
😶🌫️ Also consider the environmental humidity: if the air is particularly dry, it is advisable to increase the humidity around the plant, for example by placing it on a tray with water and stones or using a humidifier.
By placing your Dieffenbachia in an environment with diffused light and moderate temperatures, you will encourage healthy and lush growth, allowing the plant to fully express its tropical beauty, without compromising its health and vitality.
Outdoor Growing: Where and When
Dieffenbachia, although typically grown indoors, can be grown outdoors in regions with temperate or subtropical climates.
In Italy, especially in the southern regions with mild winters and hot summers, it can be grown in gardens or terraces, bringing its exotic touch. In Mediterranean regions with mild winters and hot summers, such as Sicily, Calabria, Puglia and Sardinia, it thrives well outdoors.
Outdoor Dieffenbachia requires a partially shaded location protected from drafts. In colder climates, it is best to grow it in a pot and bring it indoors during the winter.
Watering and Humidity
Dieffenbachia requires careful management of watering and humidity to ensure healthy, vigorous growth.
It is important to keep the soil constantly moist, but not too wet, to avoid problems such as root rot. Excess water can compromise the health of the plant, so it is advisable to let the soil dry slightly between waterings. A good method is to check the humidity of the soil by inserting a finger into the substrate: if it is moist, there is no need to water.
As for environmental humidity, Dieffenbachia prefers environments with moderate humidity, typical of tropical forests. During the driest months or in particularly arid environments, it is possible to increase the humidity around the plant by using a humidifier or by placing the plant on a tray filled with water and pebbles, being careful not to let the water touch the bottom of the pot directly to avoid stagnation. Another method is to spray non-calcareous water on the leaves.
Properly managing watering and humidity will ensure a lush, foliage-healthy Dieffenbachia.
The optimal substrate
Choosing the right substrate is also essential for the health and well-being of Dieffenbachia, as with any other plant. A high-quality substrate provides the necessary support for the roots and promotes proper growth of the plant.
A good substrate should be well-draining, allowing excess water to drain quickly and avoiding stagnation that could lead to root rot.
To grow Dieffenbachia in a pot, you can opt for a commercial substrate specifically for green plants, which usually contains a mixture of peat, perlite and vermiculite. This combination provides excellent drainage and aeration for the roots, as well as retaining an adequate amount of moisture to support the growth of the plant.
If you prefer to make your own substrate, you can create a mixture using equal parts garden soil, low pH (acidic) peat moss, perlite, and sand. Be sure to sterilize the garden soil before use with commercial products to reduce the risk of disease and pests.
Soil preparation for open ground cultivation
To grow Dieffenbachia in soil, it is important to prepare a soil that provides good drainage and at the same time is able to retain an adequate amount of moisture. Here are some tips for creating a suitable soil:
- Well-draining soil: Make sure the soil is free from standing water, which can damage the plant's roots. Add drainage material such as coarse sand or perlite to improve drainage.
- Rich in organic substance: Dieffenbachia benefits from soil rich in organic matter, which provides sustenance for the roots and nutrients for the plant. You can enrich the soil with compost or well-rotted manure.
- Slightly acidic: Dieffenbachia prefers slightly acidic soil, with a pH between 6 and 6.5. If the native soil is too alkaline, you can correct it by adding acidifying substances such as peat or fertilizers specifically for acid-loving plants.
- Well ventilated: Make sure the soil is well aerated to promote root development and prevent root suffocation. You can add perlite or vermiculite to the soil to improve aeration.
- Sterilized: Before using the soil, make sure it is sterilized to eliminate any harmful parasites or pathogens. You can do this by heating it in the oven or using specific products available on the market.
By preparing your soil according to these guidelines, you will provide your Dieffenbachia with an optimal growing environment, allowing it to develop healthily and vigorously even when grown in the open ground.
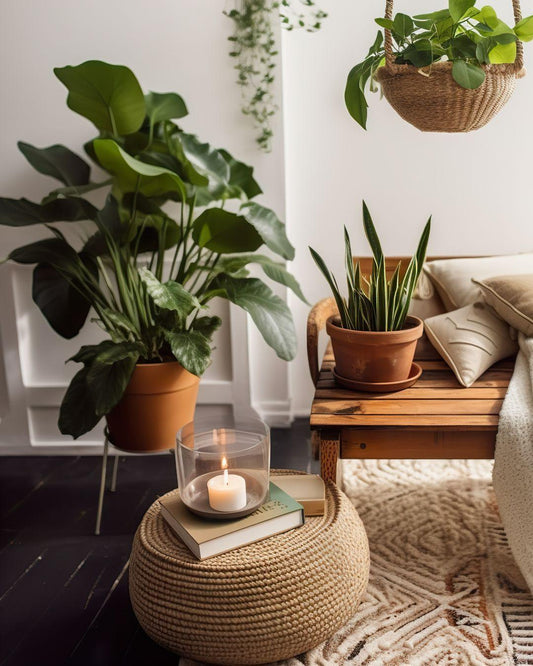
Choosing the right vase
Choosing the right pot is essential to ensure the good health of your Dieffenbachia. Here are some tips to select the most suitable pot for it:
- Appropriate size: Choose a pot that is sized appropriately for the plant’s root system and its current stage of growth. Make sure the pot is deep enough to accommodate the roots without over-compressing them.
- Draining material: Opt for a pot made of a draining material, such as terra cotta or porous ceramic, that allows excess water to drain easily. Avoid plastic or metal pots, which can retain too much moisture and cause root rot.
- Drainage holes: Make sure the pot has sufficient drainage holes in the bottom, to allow excess water to drain out freely. This will help prevent waterlogging and keep the soil well aerated.
- Aesthetics: Also consider the aesthetics of the pot, choosing a design that integrates with your home or garden. However, make sure that the shape and size of the pot are compatible with the needs of the plant.
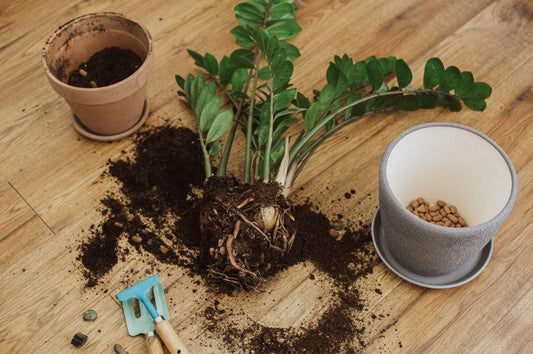
Should I repot my newly purchased Dieffenbachia right away?
Answer : It is not always necessary to immediately repot a newly purchased Dieffenbachia. However, if the pot it was purchased in is too small or if the soil is too compacted, it may be a good idea to transfer it to a larger pot with fresh, well-draining soil.
Check the roots to make sure they are not too crowded in the current pot and check that the soil is still fresh and not exhausted. If the roots are suffocating or the soil is exhausted, then it is advisable to proceed with repotting. Otherwise, you can wait until the plant shows signs of needing a new pot, such as excessive root crowding or a decline in the health of the plant.
How do I recognize exhausted soil?
Answer : Exhausted soil is typically dry, compacted, and devoid of organic matter, and usually has a whitish film on the surface that resembles mold. You may notice that the soil no longer holds moisture as well as it used to, and that the roots of the plant are suffocating and tightly entwined in the pot. Additionally, there may be poor plant growth or a deterioration in the overall health of the plant. If your soil shows these signs, it may be time to repot your plant.
Fertilization Guide
Fertilization is a crucial aspect of Dieffenbachia care. Through these attentions you will provide the plant with the essential nutrients for healthy and vigorous growth. Here is a practical guide for optimal fertilization:
- Frequency: During the active growing season, which usually runs from spring to fall, fertilize Dieffenbachia every 4-6 weeks. During the winter months, reduce the frequency to every 8-10 weeks as the plant is dormant.
- Type of fertilizer: use a balanced fertilizer, liquid or granular, specially formulated for houseplants or tropical plants. Be sure to dilute the fertilizer according to the instructions on the label.
- Dosage: Avoid overdosing on fertilizer, as this may damage the roots of the plant. Always use the amount recommended on the fertilizer label and also consider the size of the pot and the growth stage of the plant.
- Application: Fertilize Dieffenbachia after watering, when the soil is moist. This will help prevent root burn from applying fertilizer to dry soil.
- Monitoring: Observe the plant carefully for signs of nutrient deficiency, such as yellowing leaves or reduced growth. If you notice these signs, you may need to increase the frequency or amount of fertilizing.
By following these fertilizing guidelines, you will ensure your Dieffenbachia receives adequate nutrition for vigorous growth and enviable beauty.
Dieffenbachia Propagation Methods
Propagating Dieffenbachia can be a rewarding way to grow new plants from existing specimens. Here are some of the most common methods for propagating Dieffenbachia:
- By cutting: Cut a healthy section of the plant's stem, making sure to include at least one or two nodes. Remove the leaves and dip the base of the cutting in a rooting hormone to encourage root development. Plant the cutting in well-drained soil and keep it moist until it develops roots.
- Root division: When repotting, you can gently divide the rhizome of the mother plant to get new plants. Make sure you have at least a couple of healthy shoots and roots on each division. Transplant the divisions into separate pots with fresh soil and water gently.
- Propagation via offset: Some varieties of Dieffenbachia naturally produce small shoots, known as offsets, at the base of the parent plant. These can be carefully pried off and planted in separate pots to grow as new plants.
- Propagation by leaves: Although less common, it is possible to propagate Dieffenbachia using a healthy leaf. Cut a leaf from the mother plant and plant it in moist soil, keeping it moist until new roots and shoots develop.
Experiment with these propagation methods to expand your Dieffenbachia collection and enjoy the process of creating new plants from existing ones.
Conclusion
Dieffenbachia is an extraordinary plant, full of beauty and tropical charm. With the right care, it can transform your home space into an oasis of lush greenery.
If you want to further explore the care of Dieffenbachia and access a complete selection of the best products for its health, I invite you to explore my shop where you can find a selection of pots, soils, inert materials and other accessories for growing your houseplants.
Click here to visit the violaplants.com shop